Friday, June 1, 2012

First Seattle Modern Quilt Guild Sew-in

Last Friday, May 25, I went to my first Seattle Modern Quilt Guild meeting/sew-in! I had so much fun and everyone was nice, welcoming and encouraging. 


second.quilt.blocks

I was able to do a little show and tell with my first quilt (still in progress), true up the blocks for my second quilt, and work on the layout. I got a ton of positive feedback that really uplifted my spirits and gave me confidence in my abilities. It was just what I needed and I am so excited to attend tomorrow's sew-in!


Best,
Allison

Thursday, May 31, 2012

First Quilt: Binding


*This is the fourth post in a series on making my first quilt, please click these links to read the first, second and third posts.*

The last two months have been busy! In-between fabric shopping and starting on my second quilt (I promise to post on this soon) I've managed to make and attach the binding onto my first quilt. Now it's the fun part: hand stitching the binding to the back of the quilt.

Phase Four: Binding

Making the Binding

I didn't want to try bias binding for my first quilt so I went with a straight-grain double-fold binding. I joined my 2 1/2" strips together using bias seams. And in my usual detail oriented fashion I made sure that all the bias seams were angled in the same direction. 

Attaching the Binding

I'll admit, I was nervous to attach the binding to my quilt so I made a mock-up. I made a mini quilt sandwich and binding out of scraps to practice on. I noticed that when I folded the binding to the back that it wasn't covering up the stitches. My seam allowance was a little too wide! This would have been very painful to realize after sewing binding around an entire quilt. This was very helpful and I highly recommend it!

After the binding was pressed it was time to attach it to the quilt. I was advised by my neighbor/quilting friend to sew the binding on and then trim off the excess batting and backing fabric. So, I did my best to line up my rulers to make sure that my corners were square and my sides were straight. I drew some guidelines with a water soluble marker. It didn't look too bad considering I didn't true up the quilt top before it was quilted….

I found the information and instructions on making and attaching binding in The Quilting Answer Book by Barbara Weilan Talbert easy to follow.When it came to joining the ends of the binding together, I was really scared but it turned out beautiful the first time! See if you can find the seam...

binding.seam

Hand-Stitching the Binding

Check out this video on YouTube for a great tutorial on hand-stitching binding to a quilt back. 

I practiced hand-stitching the binding down on my mock up and was ready to go! After I rounded the first corner and was headed down the side I noticed that the bound edge of my quilt  was getting narrower and narrower. Discouraged, I took a break for a week or so. After getting advise from my quilting friend/neighbor I decided to rip out the stitches (only about 18") and start over. Instead of rolling the binding over so it was tight against the edge of the quilt I focused on maintaining an even width and covering the stitches on the back. It looks much better now and no one will ever notice.

So where did I go wrong? Should I have squared up the quilt top before quilting it? Were the guidelines drawn incorrectly? Did I sew the binding on crooked? Did I try to true up the quilt when trimming off the excess batting and backing fabric leaving me with uneven seam allowances?

My guess is that it was probably a combination of some or all of the above. Maybe it will make more sense when I get to this stage on my next quilt…. Wow. I didn't think I'd have this much to say about the binding…

I'll leave you with a sneak peak of my quilt:

quilting.detail

Best,
Allison

Monday, March 19, 2012

First Quilt: Piecing and Quilting


*This is the third post in a series on making my first quilt, please click here to read the first post and click here for the second post.*


Wow, I had a fun weekend! I finished quilting my quilt and went to my first quilt show. Now where did I leave off?

Phase Three: Piecing and Quilting

Piecing the Strips
While doing some research on how to piece and press strip quilts I stumbled across a wonderful strip quilt tutorial on one of my favorite blogs Film in the Fridge. I followed Ashley's advice on piecing and trimming the strips and it worked out great. Click here to visit Ashley's inspirational and informative tutorial!

Here is a sneak peek at the quilt top:

first.quilt.pieced

Making the Quilt Sandwich
A couple weeks ago my neighbor, who is a quilter, came over and helped me spray baste my quilt. It was so great to have her help and guidance. If I was left to my own devices it probably would've taken me the whole day and hours of obsessive internet research. I laid down some newspaper around the perimeter of the quilt but alas there was still overspray….lots of over spray. Many damp paper towels later and it was finally gone. Next time I'll either do it out side (when it isn't 44 degrees and rainy) or spread out a lot more newspaper or try not to spray so close to the edge or try another basting method. I have spray basted small projects like tote bags, coasters etc. and don't remember having the over spray problem.

Quilting the Quilt
So as I mentioned earlier I finished quilting my quilt this Friday! It was definitely a learning experience as I have never quilted anything this large before. Even though it's a baby quilt there is still a lot of fabric to maneuver and it's kinda heavy! I chose to stitch 1/4" on either side of each seam, the exception being a couple strips that were to narrow.

In the beginning I thought it would be a great idea to have my sewing machine table against a wall, that way the quilt wouldn't fall off onto the floor. After a few frustrating and kinda crooked rows of stitching I moved my sewing table away from the wall and butted a little folding table up to the back of it. The folding table is a few inches shorter than my sewing table but it seemed to work out alright. 

Ok, so now I was on a roll… except for one little thing. I was using a walking foot yet I was still having a hard time feeding the quilt through at the beginning of each row. I finally figured it out! My walking foot was sticking to the over spray on the batting. So at the beginning of each row I had to stop after a couple stitches and peel the sticky batting off of my walking foot. With each row the stitching got better and better. I just keep telling myself that it's my first quilt and no one will notice but me! 

I can't wait to get this quilt done! My goal is to work on the binding this week. I have at least three baby quilts that are in the final stages of planning/fabric acquisition (my favorite part!) and i'm dying to get started! This is sooooo much fun!

Coming next in the First Quilt Series-
Phase 4: Binding


Have a lovely day!
Allison


Friday, March 2, 2012

First Quilt: Pattern Selection and Improvisational Cutting


This is the second post in a series on making my first quilt, please click here to read the first post.

Phase Two: Pattern Selection and Improvisational Cutting

After many hours searching for the perfect pattern for my first quilt I decided to go with a strip quilt. There's no blocks to match up, no sashing or borders, just nice and easy strips. 

Originally, I was just going to keep it simple and follow the Easy, Striped Baby Quilt pattern from the book Quilting for Peace by Katherine Bell. It is a strip quilt that uses four different prints and three different sized strips of each. I, of course, wanted to use five prints. So what's a girl to do? Make her own pattern!

I felt that I needed to create a pattern or have some strict rules to follow for my first quilt so that it would be easy and foolproof, right? Wrong, it just stressed me out. 

quilt.pattern.notes

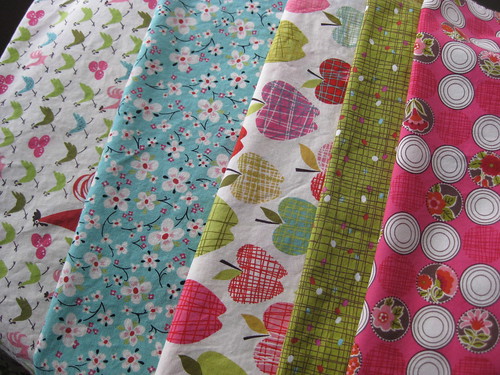
Unhappy with my attempts, I sought advice from others. My Husband suggested sketching a mock up of what I want the quilt to look like, either on paper or in Adobe Illustrator. Then create the pattern from the sketch, a great idea that I'll probably try out in the future. The next day, a customer at my work suggested choosing my favorite print and having more strips of that one and less of the others. She said start by cutting one strip of each of the five prints and then build from there. And the wheels started turning…


Improvisational Cutting

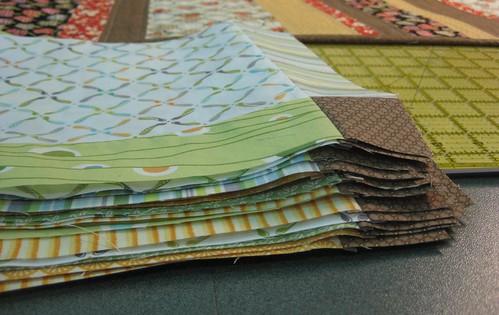
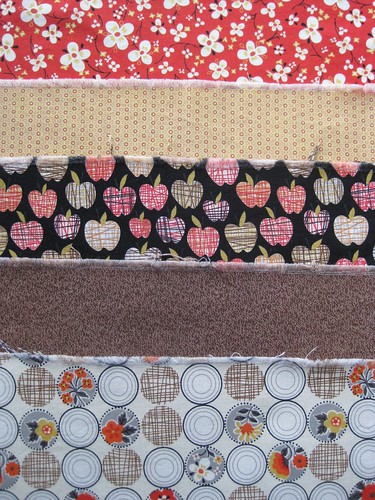
I'll admit I was super nervous to cut those first five strips but once I started I couldn't stop! I cut strips of various widths and draped them over my ironing board so I could see how they looked next to each other. Then I rearranged them until I liked the order, looked for what was missing and then added more. In some cases a strip would be to wide so I'd just trim it down. It was so much fun! 

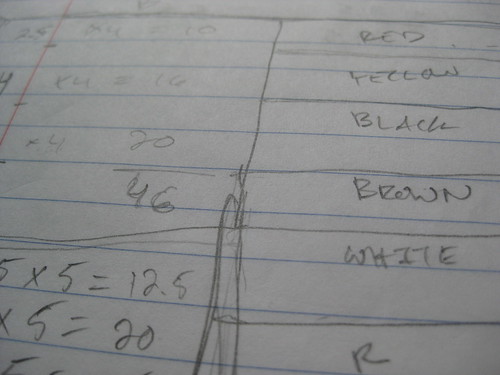
I knew that I was aiming for a finished length of about 49" so I measured the amount of space the strips were taking up on my ironing board and then subtracted half an inch per strip (1/4" seam allowance on each side) to get a rough idea of the finished measurement. I quickly ran out of room on the ironing board so I laid them out in order on my cutting table. Measured again, added a few more strips and took pictures so that I could reference the order. I apologize for the lighting in the photo, this was taken late one night and I didn't think I'd be posting it.

strip quilt layout

Coming next in the First Quilt Series-
Phase 3: Piecing and Quilting

Have a lovely day!
Allison

Saturday, February 18, 2012

First Quilt: Fabric Selection


Happy New Year! I hope you had a lovely Christmas (or insert your preferred holiday here) and here's to a happy, healthy and crafty New Year!

I'm so excited I can hardly contain myself....I am finally making my first quilt! I'm going to blog about my adventures, this will be the first in the series. Stay tuned for more!

Phase One: Fabric Selection

Life's too short and I'm done thinking about making quilts, its time to make one. This all started when I decided to sort through my fabric stash the other weekend. I stumbled across some Alexander Henry fabric from the Farmdale line. I have five of the prints from the bright pinks, aqua and lime colorway (please excuse the wrinkles).

Farmdale fabric brights

I love the bright colors and the retro style of the prints and thought it would be great for my first quilt… but I felt too much pressure to find the perfect pattern and was afraid I'd waste the fabric.

Luckily, I remembered that I had two other Farmdale prints from the browns, reds and oatmeal colorway in my stash: the one with the black background and apples and the oatmeal one with circles (pictured below)…. I'm not sure why I bought them as these colors are very different from what I like.  Then I got a fabulous idea! It's my first quilt, if it doesn't turn out I won't miss this fabric. Perfect! 

I only had a 1/2 yard of each so I went online and bought some of the Farmdale "Blossom" print in red. I wanted to use the Easy, Striped Baby Quilt pattern from the book Quilting for Peace by Katherine Bell. It calls for 1/2 yard each of four prints and I only had three so I headed over to The Quilting Loft in Ballard (one of my favorite fabric shops). Laurie helped me choose two fabrics to go with the three I had. She was very helpful and taught me some really great tips on choosing fabric: 

1. Find the best light, we took our fabric selections into their classroom. If it was during the day we probably would've viewed them by a window.

2. Walk away then turn around and take a one-second glance at your fabric selections, see if any stand out from the rest.

3. Use your gut and be open to fabrics you wouldn't normally consider. So true!

Here are the fabrics I ended up with:

fabric for first quilt

Coming next in the First Quilt Series-
Phase 2: Pattern Selection and Improvisational Cutting

Have a lovely day!
Allison

Tuesday, December 6, 2011

Pinteresting... Very Pinteresting.....


I've always wanted a better way to organize my bookmarked websites and I  think I may have the perfect solution! I started noticing this little red button on quite a few blogs:

  Follow Me on Pinterest

I thought "ooooo maybe this magical red button will take me somewhere sewing related" because of the "pin" in the name. This magical little red button took me to a place better than I could even imagine ..... to Pinterest.

Pinterest is like a virtual inspiration board where you can organize and store links to things that inspire you. 

The minutes can quickly turn into hours as I browse through various "pinboards" and I am filled with inspiration. I feel like I did when I first found Etsy  and Flickr: giddy, inspired and eager to join.  Alas, I'm going to wait until after Christmas to set up my Pinterest account because I have presents to make, cards to send, cookies to bake..... you know the drill!

Click here to visit Pinterest, type something fun like "Christmas Crafts" into the search box and see what fun ideas pop up. Have fun looking at all the eye candy!

Saturday, October 22, 2011

Studio Makeover - Progress Update- Perfectly Imperfect


(If you are new to my blog please read all three of my previous posts in chronological order so that this one will make sense. )

Wow, the last two months have flown by!  Welcome to the dark gray rainy days of October!  Let's go back to where I left off in the studio makeover tale…..back to the sunny days of August. Oh, how I miss summer!

PHASE THREE 
I'm proud to say that I have gotten rid of a lot of stuff.  By the end of the stay-cation there were 2 garbage bags, 3 bags of recycling and a box full of paper to shred.  I also chose to part ways with all of this:

goodbye.stuff

I continued going through my supplies and tools and let go of even more things. Then somewhere along the line progress came to a halt. I can't remember when, why or how, but it did.

I was really hoping that my studio would be done by now and I'd do a fabulous reveal of my perfectly organized and creatively decorated sanctuary. I put off blogging about it because I didn't want to show the world my studio until it was complete and perfect.  I had a realization that I want my blog to be a truthful representation of my life and creative process.

So, without further ado my studio in it's PERFECTLY IMPERFECT state!!!!  (I'll admit I did tidy up a little before I took these pictures)


oct.studio.left
My new sewing area!
oct.studio.right
Yes, that chair is still covered in fabric....
oct.studio.back
That wall needs some adornment. Any ideas?


There is still more work to be done... more sorting, organizing and purging... and I will get there eventually ... one piece at a time!

Have a lovely day!

Best,

Allison